
To move your website to WordPress successfully, start by auditing your existing URLs, creating a full backup, setting up a clean WordPress installation, importing your content, mapping 301 redirects, reviewing SEO elements, testing tracking and affiliate links, and only launching once crawl errors and technical issues have been resolved.
For affiliate marketers, a successful WordPress migration is primarily about protecting the pages that already generate traffic, leads, and affiliate revenue.
At ELKING, we approach migrations as a revenue-preservation process rather than a simple platform change. Product reviews, coupon pages, comparison content, affiliate links, schema markup, internal linking structures, and tracking scripts all require careful attention before any DNS updates are made.
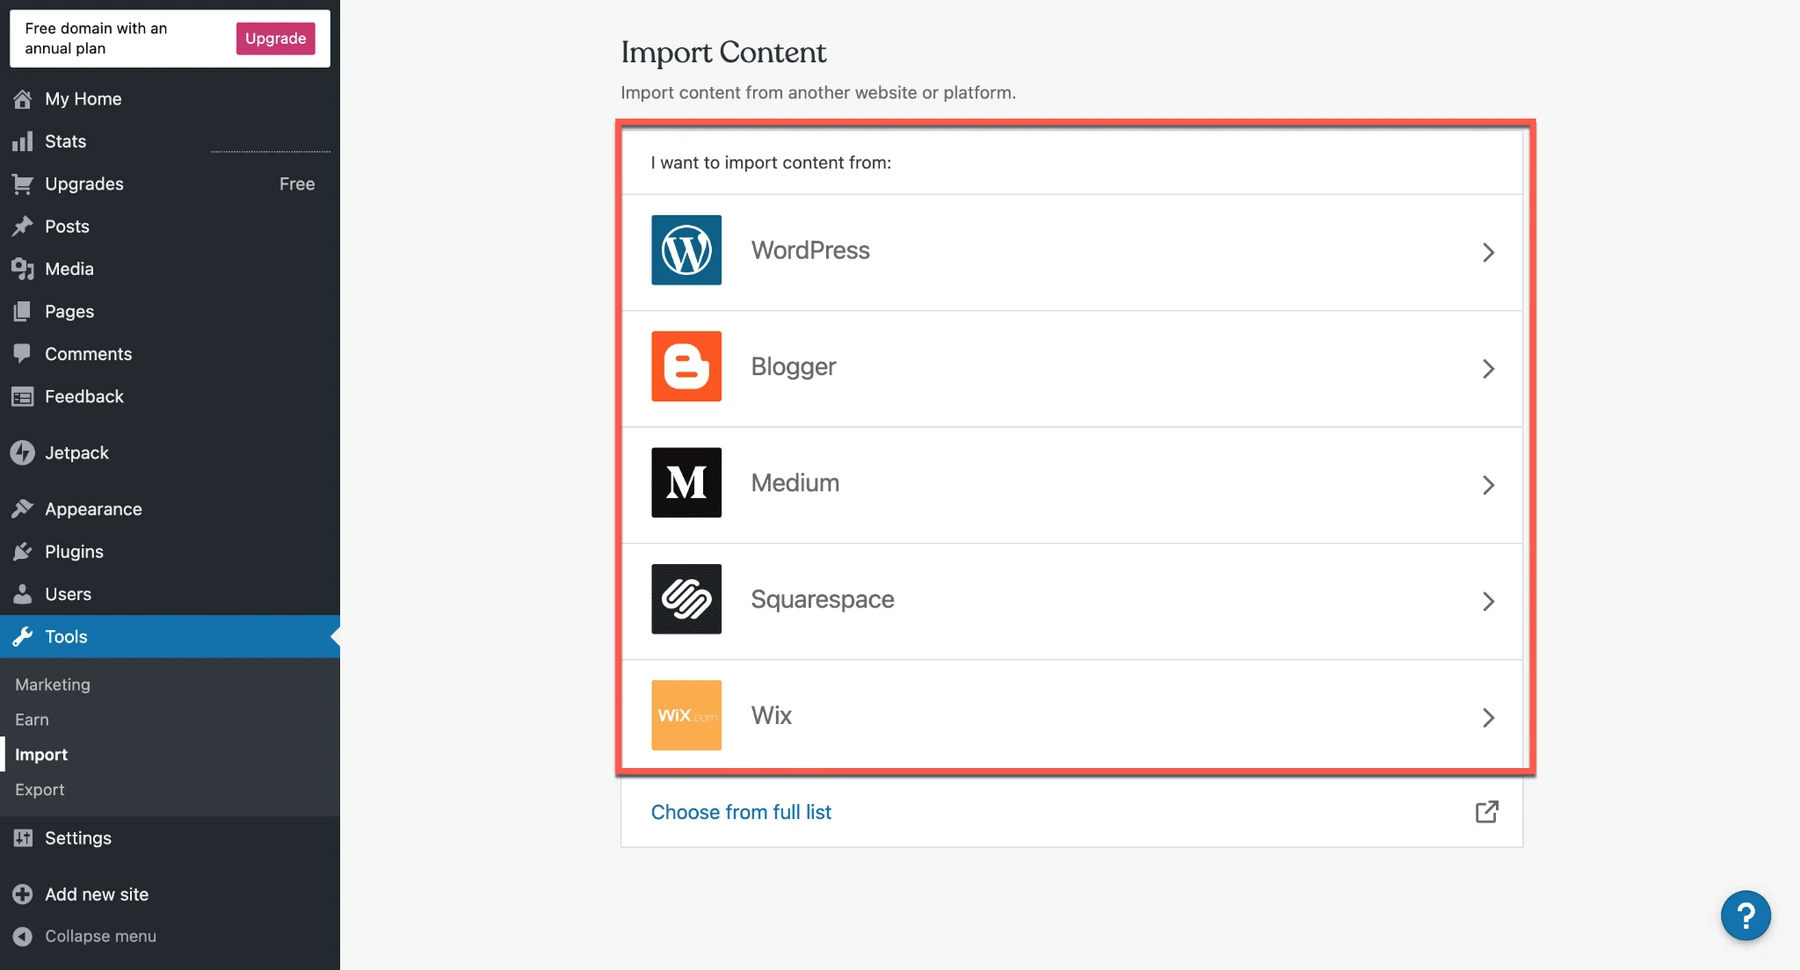
WordPress.com supports content imports from a wide range of platforms, including WordPress.org, other WordPress.com websites, popular blogging platforms, website builders, and services such as Wix, Squarespace, Weebly, Medium, Substack, Tumblr, Facebook, and Gumroad.
For self-hosted WordPress websites, WordPress.com also provides migration options through self-service tools and the All-in-One WP Migration plugin, allowing users to transfer content, media files, themes, and plugins more efficiently.
Migration Goal: Keep Money Pages Safe
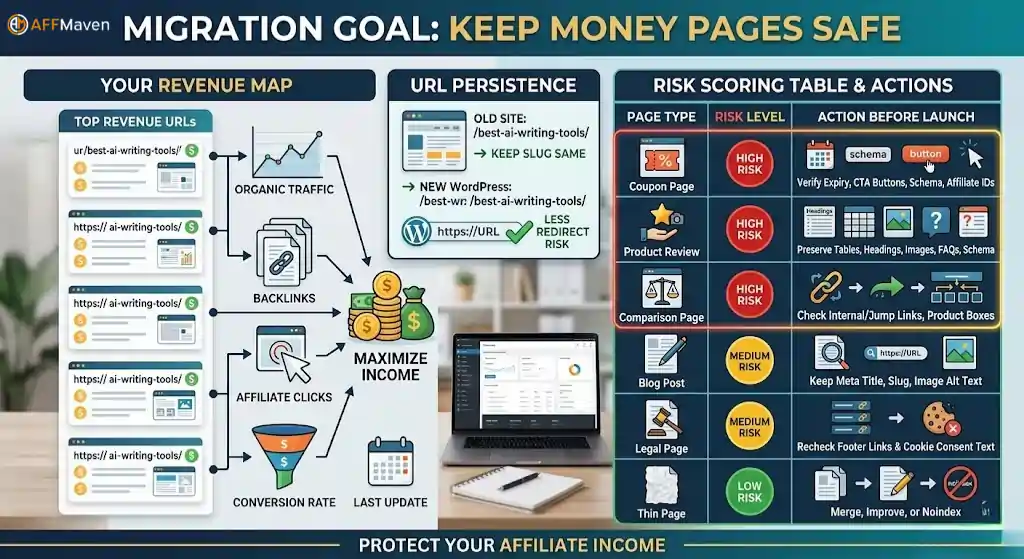
Affiliate websites carry a different level of migration risk than standard blogs. A typical blog may lose a few older articles with little impact, but an affiliate site can lose significant revenue if a key review, coupon page, or comparison article stops working properly.
Before migrating, identify every URL that contributes to revenue. Track important metrics such as organic traffic, backlinks, affiliate clicks, EPC, conversion rate, and the date of the most recent update. At ELKING, we refer to this as a money page map.
Wherever possible, keep existing URL slugs unchanged during the migration. For example, if a page currently uses /best-ai-writing-tools/, the WordPress version should retain the same URL structure.
The fewer URL changes you make, the lower the risk of redirect issues, ranking fluctuations, and lost affiliate revenue.
Use this quick scoring table before touching WordPress:
| Page type | Migration risk | Action before launch |
|---|---|---|
| Coupon pages | High | Keep URL, expiry fields, schema, CTA buttons, affiliate IDs |
| Review posts | High | Preserve headings, tables, images, FAQs, schema |
| Comparison pages | High | Check internal links, jump links, product boxes |
| Blog posts | Medium | Keep meta title, slug, image alt text |
| Legal pages | Medium | Recheck footer links and cookie text |
| Thin pages | Low | Merge, improve, or noindex if needed |
Pick WordPress Path by Current Platform
The migration process should be based on your current platform. Avoid copying content manually without a plan, as each CMS handles URLs, images, metadata, redirects, and content structures differently.
A proper migration involves transferring all essential site elements while preserving SEO value, functionality, and user experience.
WordPress.com distinguishes between migration and import. A migration transfers an entire website from an existing WordPress installation to WordPress.com hosting, while an import typically transfers selected content such as posts, pages, or media files.
A content-only import can move core website content, including posts, pages, and media assets. In contrast, a self-service migration can transfer a broader set of site components, including content, media libraries, plugins, and themes.
| Current platform | Best WordPress move | What needs extra care |
|---|---|---|
| Self-hosted WordPress | Migration plugin or WordPress.com service | Plugins, theme data, redirects, custom fields |
| Wix | Import plus manual rebuild | URL changes, image paths, forms |
| Squarespace | Import plus design rebuild | Gallery blocks, product pages, redirects |
| Shopify blog | Export content, rebuild affiliate pages | Product links, blog URLs, collection links |
| Static HTML site | Manual page rebuild | Metadata, internal links, media names |
| Custom CMS | CSV/XML export plus custom import | Taxonomies, schema, author data |
If your site already uses WordPress, use a staging copy first. If your site uses Wix, Squarespace, or static HTML, expect manual cleanup after import.
Build a Pre-Migration SEO Vault
Before starting the import process, export and document everything. Never rely on memory during a migration, especially for affiliate sites where small details can directly affect rankings, clicks, and revenue.
Create a master spreadsheet that includes:
- Full URL
- Page title
- Meta description
- H1 heading
- Canonical URL
- Status code
- Word count
- Target keyword
- Top 5 internal links
- Affiliate links on the page
- CTA button text
- Schema type
- Image file names
- Alt text
- Current ranking notes
- GA4 sessions
- Google Search Console clicks
- Affiliate link clicks
- Backlinks
According to WordPress Learn, a WordPress export generates an XML file (WXR) that contains content such as posts, pages, comments, custom fields, categories, and tags.
The platform also notes that an “All Content” export may include posts, pages, comments, custom fields, taxonomy terms, navigation menus, and custom post types.
For affiliate websites, however, an XML export alone is rarely sufficient.
Make sure to export and document affiliate tracking assets from tools such as:
- Pretty Links
- ThirstyAffiliates
- Lasso
- AAWP
- TablePress
- Product box plugins
- Coupon plugins
- URL shorteners and link management tools
Also capture screenshots of your highest-value pages before migration. If layouts, styling, or conversion elements change after the move, these screenshots provide a reliable reference for rebuilding the original user experience and conversion flow quickly.
Set WordPress Before Import
Set up WordPress on a staging environment, not on the live domain. Keep the staging site blocked from search engines using a noindex directive, then remove it before launch to ensure the site can be crawled and indexed properly.
Choose a lightweight theme that prioritises speed, usability, and layout flexibility. For affiliate websites, performance and conversion-focused design are typically more important than visual effects.
Popular options for affiliate sites include:
- Kadence
- GeneratePress
- Blocksy
- Lightweight block-based themes
These themes work particularly well for product reviews, coupon websites, comparison content, and SaaS roundups.
Install only the essential plugins during the initial setup:
- SEO plugin for titles, schema, sitemaps, and canonical tags
- Redirect management plugin for 301 redirects
- Caching plugin (if caching isn’t handled by your host)
- Image optimisation plugin
- Security plugin (if required)
- Affiliate link management plugin
- Table or product box plugin
- Backup plugin
- Schema plugin only if your SEO plugin doesn’t provide the required schema types
Avoid installing multiple plugins that perform the same function. For example, running two schema plugins can generate duplicate Article, FAQ, or Product markup, while multiple caching plugins may interfere with buttons, tracking scripts, or site functionality.
Configure your permalink structure before importing content. In most cases, affiliate websites perform best with post name URLs. If your existing site uses category-based URLs, keep the same structure unless you’re intentionally planning a full URL migration.
Before launch, create the site’s essential pages, including:
- Homepage
- Blog page
- Privacy Policy
- Affiliate Disclosure
- Contact Page
- Category hub pages
Review pages, comparison pages, and coupon pages should also display affiliate disclosures clearly and consistently to maintain transparency and compliance.
UP TO 69% OFF Migrate to WordPress.com →
Import Content With Revenue Checks
Import your content in controlled batches rather than migrating everything at once. Instead of importing hundreds of pages and posts in a single step, start with 20–50 URLs, review the results, fix any issues, and then continue with the next batch.
WordPress.com supports content imports from a variety of platforms and recommends choosing the appropriate import method based on the export file type. XML exports can typically be imported using the standard WordPress importer, while HTML-based websites may require content to be recreated manually page by page.
For HTML-based sites, WordPress.com recommends saving pages locally, copying the primary content into new WordPress pages, and uploading images separately to the Media Library.
For WordPress-to-WordPress migrations, export and import:
- Posts
- Pages
- Custom fields
- Taxonomies
- Menus
- Media files
When importing, ensure media attachments are included. After the import is complete, verify that media paths, featured images, and content formatting have transferred correctly.
For affiliate websites, perform a detailed quality check after each migration batch:
- Affiliate buttons link to the correct tracking URLs
- Cloaked links redirect properly
- Product comparison tables display correctly on mobile devices
- Coupon codes function as expected
- Review ratings and scores appear correctly
- FAQ sections expand and collapse properly
- Schema markup validates without errors
- Images load correctly and retain alt text
- Author profiles remain attached to content
- Affiliate disclosures appear before affiliate CTAs
- Table of contents links jump to the correct sections
- Internal links point to production URLs rather than staging URLs
If staging URLs need to be updated, use a search-and-replace process carefully. When working with page builders, custom fields, or other plugins that use serialized data, improper replacements can corrupt content or settings, so always verify changes before publishing.
Rebuild SEO Signals, Not Just Pages
A page should not be considered fully migrated until its search performance signals have been preserved or improved. Moving content alone is not enough to protect rankings.
Start by reviewing meta titles. Many affiliate pages rely on click-focused titles such as “Best VPN Coupons” or “Top AI Tools Compared”. If a title is already performing well, keep it as close to the original as possible unless search intent or keyword targeting has changed.
Transfer meta descriptions as well. While they are not a direct ranking factor, they play an important role in attracting clicks from search results. Preserve any benefit-driven messaging that has proven effective.
Review and rebuild the page’s heading structure:
- One clear H1 heading
- Logical H2 sections
- Concise H3 subheadings where needed
- No empty or unnecessary headings
Avoid the heading inconsistencies that can occur when using page builders or importing content from another platform.
Handle schema markup carefully during migration. Review, FAQ, Article, Breadcrumb, and Product schema should accurately reflect the purpose of each page. For example, affiliate roundup articles should not automatically use Product schema unless the content and page structure genuinely support it.
Finally, rebuild your internal linking structure, starting with your highest-value pages. Add links from your strongest traffic-generating articles to key pages on the new WordPress site, and update anchor text using relevant exact-match or partial-match phrases where they fit naturally within the content.
Redirect Map That Saves Rankings
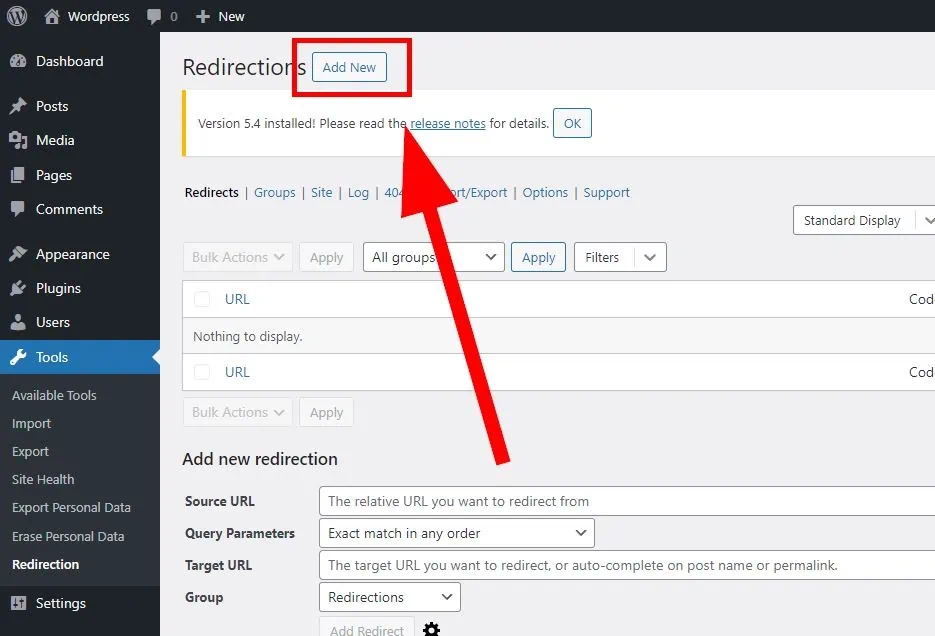
Redirects decide migration success. One wrong redirect can send a high-value review page to homepage and kill relevance.
Build a redirect map with old URL, new URL, status, priority, and notes. Keep redirects one-to-one where possible.
Good examples:
| Old URL | New WordPress URL | Redirect type |
|---|---|---|
| /best-hosting-deals.html | /best-hosting-deals/ | 301 |
| /ai-tools-review | /ai-tools-review/ | 301 |
| /coupon/brand-name | /brand-name-coupon/ | 301 |
Bad redirect plan:
| Old URL | Bad target | Why it hurts |
|---|---|---|
| Product review page | Homepage | Search intent mismatch |
| Coupon page | Blog category | Affiliate clicks drop |
| Old comparison page | 404 | Backlinks lose value |
Use 301 redirects for permanent moves. Avoid chains like old URL to mid URL to final URL. One hop is cleaner.
Check these patterns:
- HTTP to HTTPS
- www to non-www
- Trailing slash
- Uppercase URLs
- Old file extensions such as .html
- Query URLs used in ads
- UTM landing pages
- Pagination URLs
- Category and tag archives
- Image URLs with backlinks
Affiliate Tracking Must Survive
Affiliate marketers should test revenue paths before SEO crawls. A migration that keeps rankings but breaks links still loses money.
Audit every affiliate network link. Check direct links, cloaked links, button links, banner URLs, product cards, comparison tables, coupon boxes, and exit-intent popups.
If you use link cloaking, export all links before migration. Reimport them into WordPress. Match old shortlink paths if users or Google already see them.
Example:
| Old shortlink | New shortlink | Action |
|---|---|---|
| /go/brand/ | /go/brand/ | Keep same |
| /recommend/tool/ | /recommend/tool/ | Keep same |
| /out/deal/ | /go/deal/ | Add 301 redirect |
Test with real clicks. Open page, click CTA, confirm network dashboard registers click. Do not rely only on page source.
Also check consent tools. Cookie banners can block analytics or affiliate scripts if settings change.
Speed, UX, and Mobile Checks
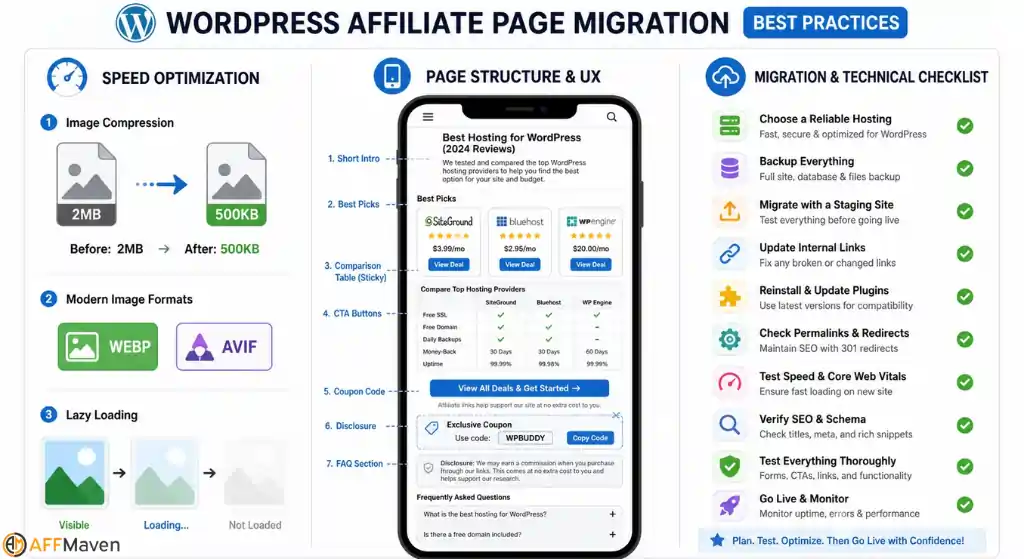
Many website migrations underperform because the new WordPress design looks more modern but introduces slower load times. For affiliate websites, speed matters because users often compare products and make decisions quickly.
Keep pages lightweight and performance-focused:
- Compress images before uploading
- Use WebP or AVIF formats where supported
- Lazy-load images and media below the fold
- Minimise unnecessary fonts and large slider elements
- Avoid design features that add weight without improving conversions
Affiliate review pages should be structured for fast scanning and decision-making:
- A short introduction that answers the main question immediately
- Recommended products displayed near the top of the page
- A comparison table where appropriate
- Mobile-friendly CTA buttons that remain easy to find
- Coupon codes positioned close to product information
- Affiliate disclosures shown before the first affiliate link
- FAQ sections near the end of the content
- Related articles placed after key conversion sections
Always test the mobile experience first. A large portion of affiliate traffic comes from mobile search, email campaigns, social platforms, and push notifications. If comparison tables break, buttons become difficult to tap, or coupon sections display incorrectly, resolve those issues before launch.
Monitor Core Web Vitals during staging and again after the site goes live. Compare performance metrics between the old site and the new WordPress version to ensure the migration has not introduced speed issues.
A faster site doesn’t just benefit SEO—it also improves user experience, engagement, and conversion rates.
Launch Day Order
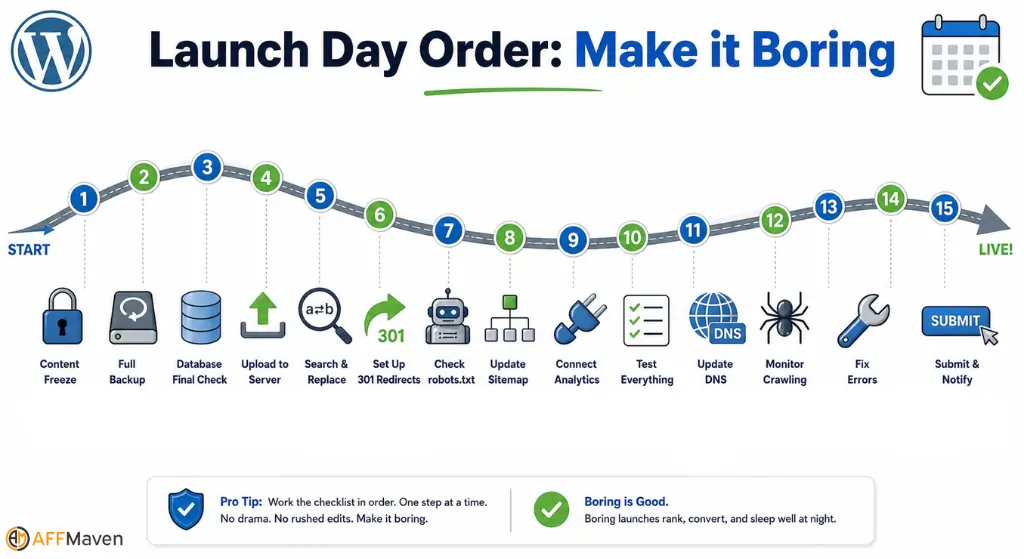
A successful launch should feel routine. If you’re encountering surprises on launch day, critical preparation steps were likely missed earlier in the process.
Follow a structured launch sequence:
- Freeze all content updates.
- Create a final backup of the existing site.
- Export the latest database and media files.
- Import the final content into WordPress.
- Run a search-and-replace to update staging URLs to the live domain.
- Activate all 301 redirects.
- Remove any staging noindex directives from the live site.
- Verify the robots.txt file.
- Generate and review the XML sitemap.
- Connect Google Search Console and analytics platforms.
- Test the homepage, top-performing content, coupon pages, and affiliate redirect URLs.
- Update DNS settings to point to the new WordPress installation.
- Crawl the live site once DNS propagation is complete.
- Resolve any 404 or 500 errors.
- Submit the sitemap to Search Console.
According to WordPress.com, the Migrate to WordPress.com plugin can transfer self-hosted WordPress websites to WordPress.com, with many migrations completing in under 10 minutes. WordPress.com also provides migration assistance and guidance for domain connection after the migration is complete.
Avoid launching late on a Friday unless your team is available to monitor and resolve issues throughout the weekend. Schedule the launch during lower-traffic periods whenever possible, and keep the previous hosting environment active for at least two weeks as a precaution.
After Launch: First 30 Days
Search traffic fluctuations are normal after a migration, but the goal is to minimise disruption and resolve issues before they affect rankings or revenue.
During the first week after launch, monitor Google Search Console daily. Pay close attention to:
- Indexing status
- 404 errors
- Soft 404 issues
- Redirect errors
- Canonical tag changes
- Mobile usability issues
- Sitemap processing status
Affiliate performance should be monitored just as closely. Track affiliate clicks each day and compare your top-performing pages against the same weekday before the migration. If traffic remains steady but clicks decline, the issue may be related to page layout, tracking links, or conversion elements.
Run a full site crawl after launch and compare it with your pre-migration crawl data. Look for:
- Missing title tags
- Duplicate H1 headings
- Broken internal links
- Unintended noindex tags
- Incorrect canonical URLs
- Redirect chains
If server logs are available, review how Googlebot is crawling the site. Ideally, search engines should reach the final 200-status URLs directly rather than passing through multiple redirects.
Where possible, update important backlinks after the migration. Contact partners, guest post publishers, software vendors, directories, and other referring websites to replace outdated URLs with the new WordPress URLs, reducing reliance on redirects and helping preserve link equity.
Maven Migration Checklist
Use this checklist before publishing a new WordPress site live.
| Task | Done |
|---|---|
| Full URL crawl exported | ☐ |
| Top revenue pages marked | ☐ |
| Affiliate links exported | ☐ |
| Meta titles and descriptions saved | ☐ |
| Redirect map created | ☐ |
| WordPress staging built | ☐ |
| Permalink format set | ☐ |
| Content imported in batches | ☐ |
| Media and alt text checked | ☐ |
| Schema rebuilt | ☐ |
| Internal links updated | ☐ |
| Coupon boxes tested | ☐ |
| Product tables checked on mobile | ☐ |
| Analytics and pixels installed | ☐ |
| Robots.txt checked | ☐ |
| XML sitemap created | ☐ |
| 301 redirects tested | ☐ |
| DNS launch done in low-traffic slot | ☐ |
| Search Console monitored | ☐ |
| Affiliate clicks compared | ☐ |
Final WordPress Migration Plan
A successful WordPress migration begins with protecting revenue-generating pages—not redesigning the site. Start by auditing your URLs, preserving existing slugs where possible, migrating content in controlled batches, mapping redirects carefully, rebuilding critical SEO elements, and testing affiliate links before making any DNS changes.
For affiliate marketers, a successful migration isn’t measured by how the new site looks. It’s measured by whether rankings remain stable, affiliate links continue generating commissions, and the new WordPress setup makes it easier to publish and update reviews, coupon pages, comparison content, and product-focused articles.
Keep your migration checklist close, validate every important page, and test every key element thoroughly. When affiliate revenue is involved, every URL matters.
Maven Verdict
|
ELKING Recommended · Verified
Up to 69% OFF WordPress.com plans today
|
Get deal → |